I had four days at the end of October. The original plan was the Ötztal, but the forecast looked marginal and a friend mentioned the Pale di San Martino group had been clear all week. I drove down from Munich on a Sunday morning and was above 2,000 metres by noon.
This post is part field notes, part processing notes — specifically about what BergCraft's provia100f profile does to Dolomite limestone in afternoon light, which turned out to be both useful and occasionally frustrating.
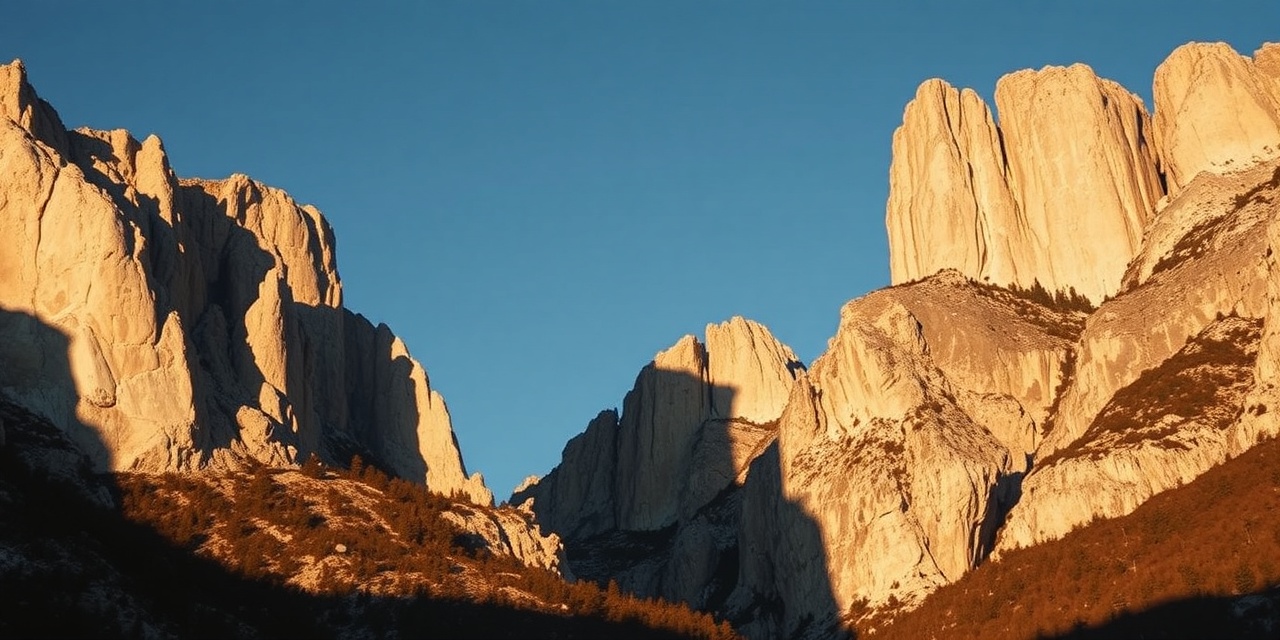
The light
Late October in the Dolomites means short days and very low sun. By 3pm the rock faces are in that transitional state where the upper third is still in direct sun, the middle third is in warm reflected light from the valley walls, and the shadows are already cold and blue. It's one of my favourite lighting conditions to photograph in, and also one of the hardest to process without losing either the warmth in the lit areas or the detail in the shadow gradation.
Fuji's in-camera Provia/Standard simulation handles it reasonably — it holds highlights well and doesn't push the greens too hard — but I always felt like it slightly over-cooled the rock shadows. I wanted to see what BergCraft's measured Provia profile would do.
The kit
X-T4 with the 90mm f/2. I used to bring the 35mm as a second lens for context shots but I've stopped — if I want to show scale I'll shoot it at f/8 with the rock face as a mid-ground and something in the foreground, which works fine on the 90mm. Everything shot RAW + JPEG, rated at ISO 160 for the bright afternoon shots, pushed to ISO 800 for the early morning attempts before sunrise.
No tripod. I keep trying to bring one and keep leaving it in the car after the first morning. The 90mm's OIS is good enough for 1/60s in calm conditions and I'm not interested enough in multi-second exposures to carry the weight up to 2,400m.
Processing
My usual flow: RawTherapee for the RAW conversion (output 16-bit TIFF, ProPhoto RGB → sRGB), then BergCraft for the film look. I do minimal editing in RawTherapee — exposure, white balance, lens correction, and that's about it. I want the film profile to do the tonal work, not the RAW editor.
bergcraft apply --profile provia100f \
  --halation 0.6 \
  --grain 0.8 \
  ./dolomites/*.tiff \
  --out-dir ./dolomites-graded/
I dropped the halation to 0.6 from the default 1.0. At full strength, the halation bloom was reading as slightly overexposed on the sunlit rock faces — the limestone is so pale and reflective that even moderately bright pixels were triggering the highlight bloom. At 0.6 it adds a sense of depth around the rock edges without making the lit faces look flared.
Grain at 0.8 rather than the default. I was shooting at ISO 160 so there's very little digital noise in the source files, and I didn't want the grain to be the first thing you notice in a print.
What the Provia profile does well here
The Provia response curve has a slight S-shape that adds contrast in the midtones without crushing the shadows. On the Dolomite rock faces this translates into better differentiation of the rock texture in the shadow gradients — you can see the layered structure of the limestone in a way that a straight contrast adjustment doesn't quite achieve. I think this is because the per-channel curves handle the warm reflected light differently from the cold shadow light, and the result is that the transition between lit and unlit areas has more visible structure.
The Provia green response is slightly stronger than Portra, which I was initially worried about — mountains have a lot of grass and larch. But in late October the larches were already past peak colour (they'd dropped most of their needles by the time I arrived) and the remaining vegetation was dry and brown, so the green push didn't cause any problems.
One lesson learned
On the third day I spent an afternoon trying to shoot directly into backlit rock faces — the sun was low enough that I could use the rock silhouette against a pale sky as a main compositional element. The exposures were tricky: I was metering off the sky and letting the rock go very dark.
When I processed those frames with provia100f, the shadow areas looked almost black and uninteresting. What I should have done was expose about a stop brighter and let the sky blow slightly — the Provia highlight curve would have handled the mild overexposure gracefully, and the shadows would have had more density to work with. The lesson is that the Provia profile rewards slightly generous exposure in high-contrast situations, because its highlight rolloff is quite gentle. Portra 400 is more forgiving of underexposure in the shadows.
I reprocessed the best backlit frames with --profile portra400 instead and they looked considerably better. Sometimes the tool matters less than knowing which tool to reach for.
Results
I came back with 340 RAW files. About 30 of them are worth keeping. Of those, maybe 12 are ones I'd print. That ratio — roughly 1 in 10 worth keeping, 1 in 30 worth printing — feels about right for this kind of trip. The mountain doesn't owe you good light.
The processed files are sitting on an external drive. I don't post to social media and I don't have a public gallery, but if you're curious about any of the specific processing choices I mentioned here, feel free to email me.